December 28, 2009

A Super Cool Kid-Friendly Craft!

Snow Trees!


Snow Tree Makers....


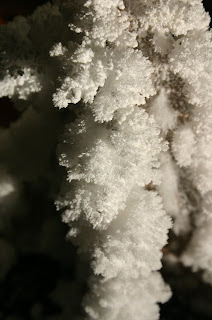
They're pretty awesome....grow super fast... AND have satisfying results! :0)


HERE'S HOW:


You will need:
Thin sheet of cardboard*Scissors* Deep saucer or small bowl* Small jar with a tight-fitting lid*1TBL table salt* 1TBL bluing (A non-toxic, old fashioned laundry whitening product that helps the crystals form-- sold in all Country Marts)* 1/2 TBL household ammonia.


  1. To create the base, cut two cardboard tree shapes (about4 1/2" tall and 4" approx. at the widest point). Cut a 2" slot in the top of one shape and in the base of the other. Join the shapes at the slots and stand the tree in a deep saucer or small bowl. Ours had a little balance problem....make sure you set these somewhere that it's easy to observe, but not easy to bump.
  2. In the jar, combine 1TBL water, the salt, bluing, and ammonia. Fasten the lid and shake well, then pour the solution into the saucer or bowl.
  3. Leave the tree undisturbed. Crystals may take as little as an hour or as long as a day to begin to form, depending on the humidity of your home. The tree will keep growing over the next few days until the liquid evaporates.
    -- Ours grew so fast (dry air must be ;0) that we could almost watch them grow!
  4. Make sure you are careful not to bump the trees! They crumble easily... :)

December 24, 2009

Typical Brady (Behind the scences... what we see every other minute!)


I wish you could have seen him when he was goofing before I brought out the camera!
He's too funny...

November 30, 2009

Oh So Yummy!


FOR the insides you'll need:
8 Semi-Sweet chocolate squares
80z package cream cheese


FOR the basic outsides you'll need:
10oz package of chocolate chips of your choice *
1TBL (or a little less) of oil

DIRECTIONS:
Beat the cream cheese until fluffy. (Food processor works for this.) Add the oil to the chocolate squares and melt in the microwave checking/stirring every 30sec or so being careful not to overheat or chocolate will seize. Add the melted chocolate mixture slowly to the cream cheese while beating until thoroughly combined. Place the filling in the refrigerator or freezer (couple minutes) until chilled enough to form balls. Make the balls in the desired size.... we use a small cookie/icecream scoop to get the right amount of filling and then roll into a ball with our hands.
It will be a little bit messy but that's normal. :) Place the finished balls back in the refrigerator while you melt the chocolate/oil for the coating.
Using a plastic fork or a candy dipper, dip the balls into the chocolate and then place on a baking sheet lined with wax paper. When done, put back in the refrigerator to harden.
Enjoy!!! :)

*We've used mint chips, semi-sweet, white chocolate etc. for the coating; They all work!
We've also added some orange flavor to our semi-sweet chocolate and it was delicious.
Feel free to get creative and drizzle over the coated truffles a different kind of chocolate or while the chocolate coating is still soft, add some chocolate sprinkles or roll in cocoa powder.
It's a lot of fun to use your imagination!

November 23, 2009

*** ☼ Florida__Fall 2009 ☼ ***

We had a wonderful time in Florida. The weather was gorgeous most of the time and made for long walks, great shelling, bike rides and fun. Here are some of the pictures from our trip. I'll just leave commentary under each in the order that they loaded up on here. :)


Sweet Kelly Joy


One of the beautiful sunsets!


Josiah, Brady, and Kayla dug this huge hole. Boy did they have a lot of people stop! :)
The sandcastle in the back was something I was able to start on but some kids on the beach ruined it before I could finish. *Arrgghhh!!!*

My Lion and the Lamb sculpture I made. :) Actually, I made two.
The first one was destroyed by some kids before I was quite done.


Miss Libby (Who lost her first tooth during our stay!)


Josiah and Brady took their skateboard stuff down with them and went to Sarasota's
super cool skate park. They had a lot of fun although first time there Brady sprained his wrist pretty bad and had to get a splint!

We had a couple windy/stormy days that kicked the surf up a bit. Derek took advantage of the weather to try out some surfing!

There were lots of birds...

The Shelling Sisters

THE shelling beach. Great shelling there always but especially this time! You should see the two HUGE shells the two littlest girls found!
♥Our new sisters picture. ♥


November 2, 2009

Florida

We're all heading to FL Wednesday! We're excited!
I'll try to post pics when we get back... no promises of how soon though. November is promising to be a very busy month for us!!
On a side note, Dad is also celebrating his birthday on the 3rd. Actually, we celebrated Sunday so we can get the food eaten before we leave. ;-)


HAPPY BIRTHDAY DADDY!!!!! :)

October 26, 2009

Happy 13th Birthday Josiah!

Josiah celebrated his 13th birthday Oct. 17!!!
Another teenager...


He got some coool Legos....

That his brothers enjoyed just has much as he did!

Happy Birthday Si!!


September 24, 2009

The Best Meat Sauce ...and Manicotti...I've EVER had...:)

BAKED MANICOTTI with MEAT SAUCE
Serves 6-8

Meat Sauce
1 onion chopped
6oz sliced deli pepperoni - You will want to use Turkey pepperoni
1lb 85% lean ground beef
1tbl tomato paste
5 garlic cloves
1/4tsp red pepper flakes
2 (28oz) cans crushed tomatoes
salt and pepper
1/4 cup of sugar -or to taste
1 bay leaf

Manicotti
3c ricotta cheese
2 1/2c shredded mozzarella cheese
1 1/2c shredded provolone cheese
1lg egg beaten
1/2tsp salt
1/2tsp pepper
1/4c finely chopped fresh basil
16 no-boil lasagna noodles

1. .....GRIND MEAT
Adjust oven rack to upper-middle position and heat oven to 375*. Pulse onion and pepperoni in food processor until coarsely ground. Add beef and pulse until thoroughly combined.

2.....MAKE SAUCE
Transfer beef mixture to large saucepan and cook over medium heat, breaking up mixture with wooden spoon, until no longer pink, about 5min. Using slotted spoon, transfer 1 cup beef mixture to paper towel-line plate and reserve. Add tomato paste, garlic, and pepper flakes to pot with remaining meat mixture and cook until fragrant, about 1 min. Stir in tomatoes,sugar and bay leaf . Simmer until sauce is slightly thickened, about 35 min. Season with salt and pepper. (At this point, sauce can be refrigerated for up to 3 days.)

3....PREPARE FILLING
Combine ricotta, 2 cups mozzarella, 1 cup provolone, egg, salt, pepper, basil, and reserved meat mixture in large bowl. Pour 2qt boiling water into 13" X 9" baking dish. Soak noodles until pliable, about 5 min. Drain noodles on kitchen towel. Pour off water and dry baking dish.

4.... ASSEMBLE DISH
Spread half of meat sauce over bottom of baking dish.
With short side facing you, spread 1/4 c of cheese filling across the bottom of each noodle and roll into a tube. Arrange in baking dish, seam-side down, over sauce.
Spread remaining sauce over manicotti. Cover with foil and bake until bubbling around edges., about 40min. Remove foil and sprinkle with remaining mozzarella and provolone. Bake until cheese is melted, about 5 min. Let cool 15 min before serving.

ENJOY! ;)


♪-Piano Lessons-♫

Hurray for Kayla!!! She has recently begun the new adventure of learning piano.
So far she is enjoying it and really likes her teacher Grace Mosher --one of my friends! :)

Kayla has been taking lessons for 3wks now and so far she's passed all her songs by next lesson!!!

.Teacher and Student.

August 31, 2009

A Lake Sunset (From Last Summer...)

My friend Emma and I took these pictures last summer...
(I took the one above for a Duck Stamp "sky" idea and she was the one who noticed the footprints and took the one below...:)

My Reese's Peanutbutter Pup...

This is Allie before she got her hair cut last Wednesday.

She's my Allie Boy! :)

And my Boo Boo...

:) We have a "feet slapping" game and that is why the one paw is tucked underneath. Usually it's both and she pushes herself around with her back legs. If a paw comes out in reach I try to "slap" it. We have lots of fun together me and my pup...♥
By the way, I haven't gotten any pictures of after her haircut but she's quite....shorn....

A Lake Sunset


August 19, 2009

Summer Tomato Pie

Mom made this delicious pie a couple weeks ago and EVERYBODY in our family loved it so I thought I'd post the recipe.

The pie Mom made. Yummy...


Summer Tomato Pie
Serves - 8

Ingredients:
2..........(9") pie dough rounds
2lb........beefsteak tomatoes (about 4lg) cored and cut into 1/4" slices
1/2tsp..salt
1/4c......mayonnaise
4tsp......cornstarch
1 1/2c.. shredded sharp cheddar cheese
4 ...........scallions, sliced thin

Directions:
1.Roll one dough round into a 12" circle. Transfer to 9" pie plate, letting excess hang over edge.
Cover and refrigerate for 30min. Roll second round out to 12" and also refrigerate for 30min.
2. Arrange tomatoes on paper towel-lined baking sheet and sprinkle with salt. Let drain 30 min, then press tomatoes with additional paper towels until very dry.
3. Adjust oven rack to lowest position, place empty rimmed baking sheet on rack, and heat oven to 450 degrees. Mix mayonnaise, cornstarch, and 1c cheese in bowl until well combined. Sprinkle remaining cheese over bottom of dough-lined pie plate. Arrange a third of tomatoes over cheese. Spread half of mayonnaise mixture over tomatoes and sprinkle with half of the scallions. Layer with another third of tomatoes, remaining mayonnaise mixture, and remaining scallions, then top with remaining tomatoes.
4. Arrange top crust on pie. Press crusts together, then trim, fold, and crimp edges. Cut four 2- by 1-inch oval vent holes in top. Place pie on heated baking sheet, bake for 10 minutes, then lower oven temperature to 325* and bake until crust is golden brown, about 40 minutes. Cool on wire rack at least 3 hours. Serve at room temperature.

ENJOY...☺

A Growing-up Week

Miss Libby had one of those "growing-up" weeks recently. She went from only swimming with a life-vest and only being brave enough to just let her face get wet, to *teaching herself* to swim (with no vest!) and jumping off the dock/& tube and going completely under. Wow.I wasn't there but I can only imagine she's saying something like:
"Mooomm!!! Are you WATCHING me?! Ohhh....Ohhh... BRADY!!! Don't touch me! Ohhooo!!!"
Getting ready...set...

GO!!! YEAH!

ALL the way UNDER the water...


*SUCCESS!!! *
(And one - rightfully so- happy, proud girl!)

Garden Pictures

I went out and took some pictures in my garden last night....☺


While I was taking pictures of tomatoes and Zinnias, Allie was busy weeding for me...

It is so cute to see her put her little face into her hole with her ears flopped over the sides! ☺

♥ Ms. Allianna ♥